
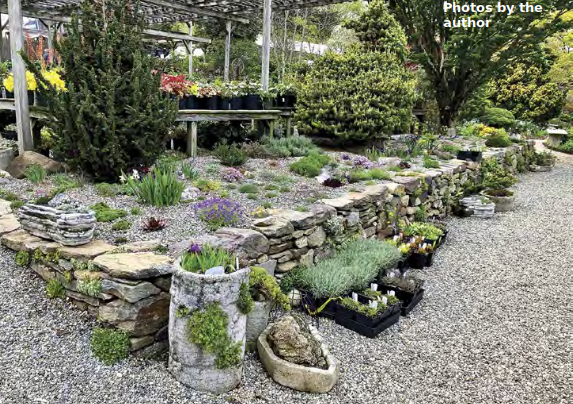
APLANTED WALL is an easy feature to love. It’s the essence of organ- ized exuberance. The care- fully chosen plants go about their life: forming cushions and rosettes, trailing, “drooling” down the wall face, filling crevices, blooming and burgeoning.
And all in the matrix of the soil in the wall. The stone wall, if you’ve managed it right, offers an enchanting structure to quietly show it all off. A perfectly beautiful partnership.
Early last year the venerable Planted Wall at Oliver Nurseries underwent
an extensive long-overdue renovation. The most obvious reason was simply that the wall itself had begun to collapse in places; decades of freezing, heaving and shifting meant the entire face needed to be rebuilt. There are not many planted walls around period, and almost never one in a state of construction. It seemed very worth- while to chronicle the process.
The timing wasn’t perfect, but the masons were ready to go. We had to abandon the ideal method: planting as you build. There just wasn’t time. Some of the established conifers were left in place. We convinced the mason’s crew to leave various planting holes in the wall that communicated back into the soil (soon to be refreshed) behind the
wall. Advance planning was key here, and explaining what we needed had to be precise. We left them some 4 inch pots and round quarts to use as a gauge which seemed to work out well. We required a “batter” which is the slope of the wall. It should not be perfectly upright. And the face is always level across the top, working with a string across its length. In all my years working with this and a few other wall gardens it’s become clear to me that most of us need help with the mechanics and the sheer weight of building a stone wall. A good mason is important. I’ve also absorbed the fact that most masons, for some inexplicable reason, don’t love standing around while a gardener selects plants, shakes soil off roots, tinkers with amendments and plants alpines. They will also look at you askance when you try to insist on watering-in the newly settled plants as they go in. Something to do with soaking their entire work environment maybe? So in the end,
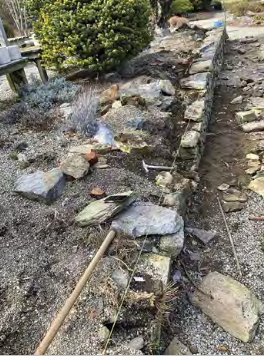
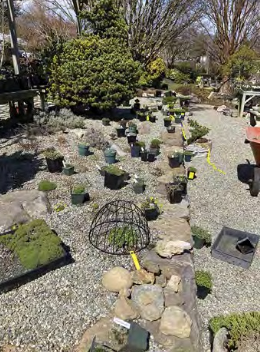
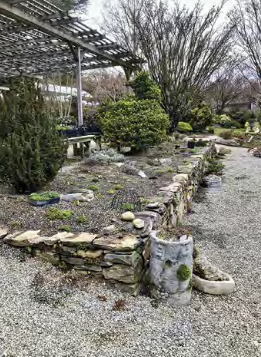
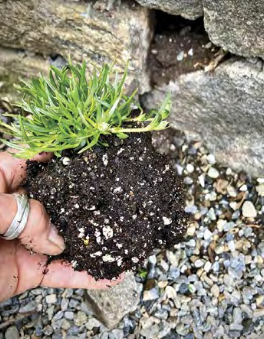
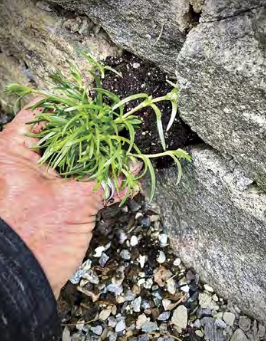
Rebuilding the wall (left). Positioning alpines for plant out (center). The wall partially planted and watered in for the day (right).
“Always select for texture and habit of foliage. It must pay the rent all season.”
what happed with this renovation was probably better after all.
Once the masonry part was finished we had to backfill behind the wall face. We mixed ingredients in a wheelbarrow. From past experience I can attest that it’s a BIG mistake to mix the soil in situ – that is, right where you eventually want it. There are always too many tiny weed roots, and the weed seed bank in the extant soil is formidable and even- tually, demoralizing. We used roughly half McEnroe soil and half garden loam. The latter against my advice as the same weed problem applies. (This was proved out by spring, there will be several years of detailed weeding ahead of us.) It is better to use purchased weed- and pathogen-free soil.
To continue with our mix: about half by volume of ¼” gravel, plus fertilizer
(a shovelful of Sustane in this case.)
We added 4 four-inch pots of Turface® (medium grade MVP®) to each barrow- ful, plus about one-third of a five-gallon bucket of coarse pumice. Mixed it all thoroughly, back filled with it and started again. This is NOT considered
a lean mix, but rather a rich one. To be honest, there are probably at least as many recipes for rock garden soil as
there are rock gardeners. I consider the gravel (up to three-quarters by volume for a lean mix) and some sort of nutri- ent to be mandatory. Pumice is great, but a luxury, and the Turface® really does help root growth.
We live in a part of the country rich in old stone walls, some dating back to the Revolution. It leads many gardeners to think of converting them to a planted wall, but that is fraught with built-in difficulties. When asked “can I just plant this up?” unfortunately the answer is no. Besides the fact that existing stone walls are riddled with soil-less gaps
and chipmunk tunnels, here are some non-negotiables:
1) It must be a retaining wall, by definition a wall that holds back soil. There must be soil behind the wall, not just inside a few crevices. Rock garden plants require a substantial root run.
A plant the size of a teacup can and often does have roots that extend a yard or more.
2) It also must be a dry wall. One not affixed in place with mortar or cement. Plants can’t grow in cement.
3) Do yourself a favor and choose a sunny exposure. The plants that every- body wants in their wall are all sun lovers. Those for shade don’t have the compact habit, and the variety of shade plants for a wall can be counted on
one hand.
4) The “Wall Garden Ideal” as mentioned earlier is to plant while you build. If someone is building it for you I highly recommend you be there much of the time, even handing them a “placeholder” pot from time to time where you want to see plants growing.
5) Never place one flowering beauty directly over another (especially drool- ers.) You want them to flourish, but not to spill over and smother their neighbors. Stagger your beauties
lest they depart.
If you are determined to colonize an existing wall, you still cannot skip certain steps. First, eradicate all weeds, whatever your method. Alpines cannot
compete with weeds and it will become utterly discouraging to you.
Excavate at least 8 inches down
(20 inches is better) and replace the soil. Choose angular picturesque larger rocks to garnish the top, use bigger ones than you think you should and bury around half of the rock, flat side down if there
is one. Choose rocks and gravel to rhyme with each other and with your environment.
Ever drive by a “Rockery” of plants mulched with glaring white marble
continued on next page
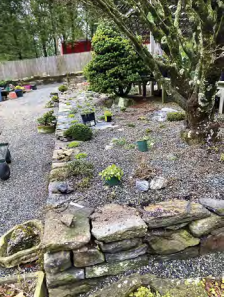
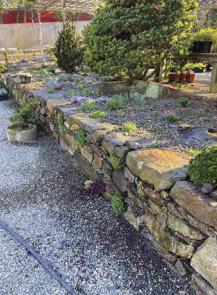
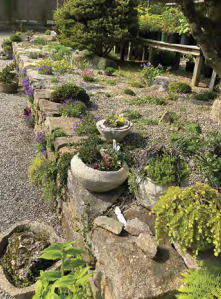
Rebuilding the wall (left). Positioning alpines for plant out (center). The wall partially planted and watered in for the day (right).
chips? Simply too jarring, and it doesn’t work here in New England. Maybe in Crete. (By the way, if you need help with a rock garden in Crete I may be able
to free up some time to help with the project. Especially a waterfront one …)
Now to let’s talk about the fun part!
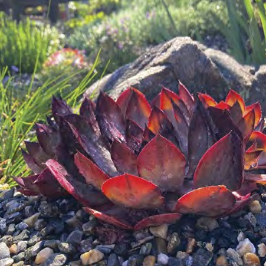
Adorning the feature with plants. Always select for texture and habit of foliage. It must pay the rent all season. Here is where you want that holy grail of: “The BIGGEST example of the tiniest, slowest growing alpine” you can manage. The buns and cushions are more important than the flowers. They are with you all year, including winter for most of them. Think about the webby rosettes of Sempervivum arach- noideum ‘Minor’, the Silver Saxifrages, the blue of Sedum dasyphyllum ‘Major’. There are dark purple leaves in winter such as the cool weather foliage of Armeria rubrifolia, Delosperma alpina and a myriad of gorgeous Semper- vivums, in tones of claret, raspberry, plum and even chartreuse.
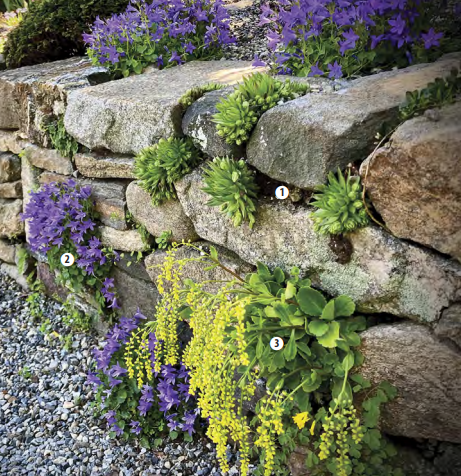
No doubt THE signature plant of the Oliver’s wall is Campanula porten- schlagiana. It blooms for a long time
in spring, dependent on when the heat finally arrives. It’s a rich blue/purple and
the perfect cascader. It was first planted in the wall by its original builder Ellie Spingarn. The form is richer and darker than the straight species. And the bells are bigger. When the wall renovation became a reality I was so glad I had passed this selection on to one of our growers a few years ago. The only cultivar that comes close to it in the trade is Campanula ‘Resholt’s Variety’, but that’s become harder to find these days.
We have also discovered what is possibly the smallest lavender out there, Lavendula angustifolia ‘Wee One.’ It’s about 10 inches in full flower. And it loves being set in the well-drained sunny wall garden. It has become some- thing of a feature. It adds drama late in the alpine season, meaning June into July. The photo tells it all. When it comes to designing a wall garden, I prefer to use a selective pallette for the wall face. We used the Campanula, and three different succu- lents, one almost white and the others yellow-green (Sempervivum arach- noideum ‘Minor,’ Sempervivum ‘Roy- anum’ and Jovibarba hirta ‘Histonii’.) There are few others succulents for
For more info on rock garden plants, check out the The North American Rock Garden Society at www.nargs.org
1. Lonicera crassifolia, 2. Jovibarbra hirta ‘Histonii’ and 3. Chiastophyllum oppositifolium
variety as well as Alyssum, Aubrieta and Silene.
On top of the wall we worked with groupings. There is a largish sweep of silver foliaged plants. Clusters of minia- ture iris are nestled near craggy rocks, patches of creeping phlox and minute veronicas form small scale ground covers.
I’ve been asked whether alpine flow- ers clash with each other. Perhaps I’m not the person to ask as I’ve been told
I have a quirky sense of color, but here is my wisdom such that it is. I’ve been an artist all my life, and to me, if there is no slight or great vibration of “clashing” then the color combination is often
dull and lifeless. A single species peony bloom will combine cadmium yellow centers with flamingo pink petals. And people swoon over them. But here is
Lonicera crassifolia another truth: alpines are mostly wild plants, and their bloom colors are pretty clean. Add to that the mediating factor of the stones and grey gravel, and every- thing seems to work. They clash well together, if they clash at all.
A wall garden is a jewel-box. Meant for up-close examination, including the cushions. Even with a mostly spring- bloom window there is the opportunity for drama most of the year. I work care- fully arranging the major players; the big sweeps, the more important punctu- ations, the foliage colors that stud the wall face or pour down it. But part
of being a gardener is treasuring the surprises the growth and exuberance of a garden create. And I wouldn’t have
Lori Chips is the creative force behind alpines and troughs at Oliver Nurseries in Fairfield. She has been committed
to the exploration of alpine plants since her student days at NYBG. She is a consultant, national expert and specialist in alpine and trough gardening. Lori has a book available from Timber Press – Hypertufa Containers: Creating and Planting an Alpine Trough Garden.
You can follow her trough-centric feed
@lorichips and @olivernurseries on Instagram.
Lori is about to start a new business growing small choice plants.
She can be reached at lorichips28@ gmail.com
Sempervivum ‘Grammens’
Saponaria pumila – When the planting hole is triangular (or any other shape) you can gently press the root ball into a matching shape before inserting into the wall. This avoids gaps and makes better contact for the plant to grow on.